So, I've finally taken the plunge (again) and am trying to reach my fitness goals! Yay! I honestly don't know why I ever quit because I never feel better then when I am working out and eating right. Life is funny that way! Oh well! No looking back! I'm writing this blog post to share with you what I am doing to get fit. I wanted to start a weekly blog post months ago for accountability, fellowship, to share ideas and well...better late than never! :) Here's what I'm doing now and plan to do!
My friend Kelli over at Small Town Stitcher started The Couch to 5K running program a few weeks ago and seemed to be enjoying it so I asked her more about it and decided to give it a try! You can even download an app for your phone to keep you on track. So cool! I finished W2D1 today and I'm telling you that it does get easier. I am actually loving it! So, if you are on the fence about what you might want to do give this workout a try. It is only 30 minutes a day/3 days a week! But, don't forget that with exercise you also need proper nutrition! Exercise and nutrition go hand in hand if you want to achieve your goals!
I went to this website to find out two things - how many calories I need per day and what ratio of food I need to eat to achieve my goals. What I like about this site is that it gives you a range of choices according to your needs and exercise levels plus its free! :) Here are the two links I used:
http://www.freedieting.com/tools/calorie_calculator.htm
http://www.freedieting.com/tools/nutrient_calculator.htm
So, I see that I need to eat 1700 calories/day with a ratio of 40-30-30 (aka Zone Diet) 170g Carbs/127g Proteins/56g Fats since I am only working out 3 days/week at this point. It is extra work to calculate all this out but if I plan ahead and keep my journal with me I will be fine :) Besides, this is what I want so I need to do what it takes :) After awhile it will be easier to guage what I'm eating etc. While I'm in there I go ahead and calculate how many calories I need to start back with P90x. This site says 2100 calories! The P90x plan says 2400! Wow! I really need to work on my nutrition before jumping into that extreme workout because I barely make 1700/day! My saving grace is that it says extreme fat loss is 1500 so I am trying to shoot for 1500-1700/day.
One more thing, I take a fat burner in the morning and afternoon for extra energy :) Some say this is cheating - WHATEVER! It has really helped and I no longer need any other source of caffeine so I have effectively cut out all soda and tea from my diet :) I also live for my protein shake because protein is another downfall of mine so this replinshes my energy after workouts and gives me the extra protein my body needs :) PLUS it tastes like a chocolate milkshake! Win-Win!
So, this is what I'm doing and plan to do. My goal is to do a weekly update - a journal of sorts - to keep track for me and hopefully inspire some of you to take 30 minutes a day to get outside and enjoy the fresh air! Let's use this as fellowship to get ideas and support each other!
Peace, Love, & Rock n Roll!

Monday, May 23, 2011
Friday, May 20, 2011
Picket Fence Tutorial
What's up my homies?!?! Happy Friday to you all! I just got back from my morning run/walk and feel GREAT! I am training to run a 5K using Couch to 5k (http://www.c25k.org/) but that's another posting in itself :)
In between crafting, exercising, keeping house, and shuttling the kids I am trying to prepare for my first ever craft fair! I am so excited! I am on a budget and spent most of it on my 10 x 10 pop up tent (which I found a killer deal on http://www.amazon.com/ by the way) so I am trying to be creative with the displays :) I want my booth to be fun and unique not the normal, boring jewelry holder displays. What can I say...I have high expectations and standards! lol So, I started hitting the thrift stores picking up cool cups and old shelves to refurbish. While in Ace, I walked by garden stakes and the light bulb went on. How cool would it be to make a little picket fence holder for some of my necklaces? I ended up having to go to Home Depot also to get the cross arms but its all good :) Now I know I can get all my items at Home Depot and plan to make a few more in different colors to sell at the craft fair!
Here's what I used to make mine:
{5} 1" x 2" x 18" garden stakes (Feel free to choose your own size stake)
{1} 1/4 x 2" x 3" piece of wood (cut into 3 12" pieces - 1 will not be used for this project and don't worry if you don't have wood cutting tools because the guys at Home Depot will be glad to cut it for you free of charge. Note: If you choose to use larger or smaller stakes you will have to size these cross arms accordingly to fit across nicely)
{10} 1" Wire Nails (If you modify your number of stakes you may need more/less of these)
{5} 1-1/2" Masonry Nails (Again if you modify the number of stakes you may need more/less of these - Also, you can use whatever type of nail you would like to use for haning. I chose these for looks but trust me they are HARD to hammer in...I plan to have Big Daddy do this part for me next time!)
{1} Hammer
Optional - Paint, paintbrushes, wire hanger or ribbon for back.
Let's begin!
Organize your stakes and cross arms to your liking.
Use the 1" nails to attach the cross arms to your stakes.
Hammer in the masonry (hanging) nails to your liking.


 Paint!

Finished! I will tell you this took me about 1 hour to make ONLY because the masonry nails were HARD to hammer in (kudos to construction guys for doing this on a regulary basis - dang). Also, this project cost me around $10. I bought a box of masonry nails which was $5! Everything else was around $5! I noticed at Home Depot I could get a pack of stakes for what I paid for these 5 at Ace...FYI. I had paint and brushes on hand so I'm not including that!
Not only can you use this for necklaces but possibly a key ring...really whatever your heart desires! :) This fence does not stand on its own so if you want it to you will have to make an attachable easel or something like that...I am leaning mine so I didn't attach anything.
Hope you have as much fun as I did making this! More to come on making your craft booth awesome with low funds :) Have any ideas you would like to share? Please comment or email me below! I would love to hear from you!
In between crafting, exercising, keeping house, and shuttling the kids I am trying to prepare for my first ever craft fair! I am so excited! I am on a budget and spent most of it on my 10 x 10 pop up tent (which I found a killer deal on http://www.amazon.com/ by the way) so I am trying to be creative with the displays :) I want my booth to be fun and unique not the normal, boring jewelry holder displays. What can I say...I have high expectations and standards! lol So, I started hitting the thrift stores picking up cool cups and old shelves to refurbish. While in Ace, I walked by garden stakes and the light bulb went on. How cool would it be to make a little picket fence holder for some of my necklaces? I ended up having to go to Home Depot also to get the cross arms but its all good :) Now I know I can get all my items at Home Depot and plan to make a few more in different colors to sell at the craft fair!
Here's what I used to make mine:
{5} 1" x 2" x 18" garden stakes (Feel free to choose your own size stake)
{1} 1/4 x 2" x 3" piece of wood (cut into 3 12" pieces - 1 will not be used for this project and don't worry if you don't have wood cutting tools because the guys at Home Depot will be glad to cut it for you free of charge. Note: If you choose to use larger or smaller stakes you will have to size these cross arms accordingly to fit across nicely)
{10} 1" Wire Nails (If you modify your number of stakes you may need more/less of these)
{5} 1-1/2" Masonry Nails (Again if you modify the number of stakes you may need more/less of these - Also, you can use whatever type of nail you would like to use for haning. I chose these for looks but trust me they are HARD to hammer in...I plan to have Big Daddy do this part for me next time!)
{1} Hammer
Optional - Paint, paintbrushes, wire hanger or ribbon for back.
Let's begin!
Organize your stakes and cross arms to your liking.
Use the 1" nails to attach the cross arms to your stakes.
Hammer in the masonry (hanging) nails to your liking.


Finished! I will tell you this took me about 1 hour to make ONLY because the masonry nails were HARD to hammer in (kudos to construction guys for doing this on a regulary basis - dang). Also, this project cost me around $10. I bought a box of masonry nails which was $5! Everything else was around $5! I noticed at Home Depot I could get a pack of stakes for what I paid for these 5 at Ace...FYI. I had paint and brushes on hand so I'm not including that!
Not only can you use this for necklaces but possibly a key ring...really whatever your heart desires! :) This fence does not stand on its own so if you want it to you will have to make an attachable easel or something like that...I am leaning mine so I didn't attach anything.
Hope you have as much fun as I did making this! More to come on making your craft booth awesome with low funds :) Have any ideas you would like to share? Please comment or email me below! I would love to hear from you!
Wednesday, May 11, 2011
Basic Bracelet Tutorial: Using Crimps
I wrote up this tutorial for my VB, Brittany over at House of Sorensens, but wanted to share with y'all in case you didn't make it over for a visit :)
This is next edition in my series of basic jewelry making tutorials. If you missed the first one please click here and enjoy! If there are any techniques you would like to learn please let me know! I am always open to ideas for more on tutorials!
Now, for this next tutorial I chose the basic bracelet: using crimps. Once you master using crimps you can make necklaces, anklets, etc! So fun! Like the first tutorial so I took tons of pictures!!! Please feel free to contact me, tricia.iheartrocknroll@gmail.com, with any questions, comments, and/or suggestions you may have! I would love to hear from you!
STEP 1
• Gather your tools - you will need flat-nose pliers and cutters (these tools are easily found at all craft stores and even Walmart).
• Gather your materials – you will need soft flex beading wire, a measuring instrument, one jumpring, two crimps, desired clasp/toggle and beads.

Useful Notes: I use Soft Flex Beading Wire – Size Medium – because it is versatile and can be used for most beads. There are different sizes so be sure to check the type of bead you are using and then select your beading wire accordingly. There are several varieties of beading wire but I strongly recommend this exact brand. It does cost a little more but it is worth the investment.
The measuring instrument can be a bead board or tape. I have and use both but I recommend having a measuring tape with both inches and mm. This comes in handy when you are trying to purchase online and all the measurements are in mm….can you tell I learned this the hard way
For the jumpring I chose a 5mm open ring I had on hand. I use this size because anything smaller would make it difficult to attach a clasp to when attempting to wear the piece of jewelry. Please be aware they have open and closed jumprings – both have their uses but again I prefer the open styles.
The crimps are so tiny so it is important to bead on a surface using a beading mat or towel so if it falls it won’t bounce into oblivion….again learned this the hard way. This is where the measuring tape also play a vital role because they have tiny and then speck of sand tiny crimps. For this project and most of the ones you’re likely to do use 3mm crimps.
For the clasp, I used a basic springing clasp I had on hand. Again, this is based on preference. There are so many styles and options so feel free to choose your favorite.
Beads are a no brainer – make something you want to wear or give as a gift. Don’t feel obligated to copy me exactly. The concept is the same no matter what the product looks like in the end! I chose beads I had hand and needed for a charity donation. Think Pink!
STEP 2
• Slide your beads onto the stringing wire. DO NOT precut the beading wire. Leave that to the end for sizing purposes.

STEP 3
• Once you have the desired length, take the crimp and slide it onto the stringing wire followed by the jumpring.
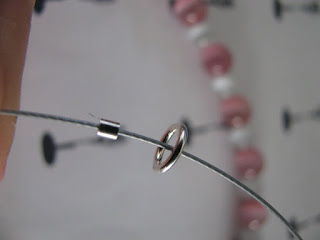
STEP 4
• Loop the stringing wire around the jumpring and back through the crimp.

STEP 5
• Slide the crimp all the way up to the jumpring making it as flush as possible.

STEP 6
• Using the flat nose pliers smash the crimp onto the stringing wire. Be sure to smash it down against the stringing wire laying side by side not stacked so it will smash down nicely and as tightly as possible.

STEP 7
• Using the cutters, cut the stringing wire closely to the crimp but not flush with the crimp! Since these beads have bigger holes I like to leave a little tail to tuck in for more stability. Please note, if your beads are smaller you will not be able to tuck the tail so it is important that you have smashed the crimp correctly as outlined in STEP 6 to ensure stability.

STEP 8
• Tuck the little tail in and slide the beads down to the crimp so they are as close to the crimp as possible. This is easy but very important! Make sure while working on the other end that these beads stay flush with the crimps. NO GAPS ALLOWED!

STEP 9
• Now its time to cut the stringing wire from the spool. I usually cut 2 ½ inches from the last bead to give myself enough room too work and at the same time not waste any unnecessary stringing wire.

STEP 10
• Slide the last crimp on followed by your clasp/toggle of choice.

STEP 11
• Loop the stringing wire around the clasp/toggle and back through the crimp.

STEP 12
• This is SOOOOOO important! You are going to have to work on how you handle your hands….make sense? In this step you have to again pull the crimp as close to the clasp/toggle as possible but at the same time make sure the beads are still flush with the crimp at the other end. This will ensure you have no gaps in the bracelet when you are finished. I hold my bracelet up during this step and pull at the same time to make sure both ends are flush with the crimps. This has to be the trickiest part of the entire process which after practice is a breeze!

STEP 13
• Time to smash the final crimp and cut the tail! Since my beads have larger holes I will leave a small tail to tuck into the bead hole for added stability. Please note if your beads have small holes and you are not able to tuck the tail please cut off the tail as closely as possible to the crimp. This will ensure stability in this instance.


Voila! You have just made a rocking bracelet! I hope you have fun following along! Please send pics of your creations to tricia.iheartrocknroll@gmail.com! I would love to see what you’re creating!

Wednesday, May 4, 2011
LylaBug Creations: A New Par-Tay Is Underway!
Congrats to one of my newest friends
She just reached 500 Fans on Facebook!
Not a fan? What?!? You need to be!
It all started with a skirt for me and I was hooked!
You can tell how much she loves what she does by the quality of her product - EXCELLENT!

And now...she is hosting a 500th Fan Giveaway to say THANKS for being her fan! There are some awesome prizes up for grabs including something from me so head on over and show her some love! You won't regret it!

The par-tay will run for one week, May 4th - May 11th!
Don't let it slip past you!
For all the details visit her celebration album!
For all the details visit her celebration album!
Congrats again Shaunna!
You are a rocking chick!
Monday, May 2, 2011
Introducing Flutterby Kisses!!!
CONGRATS COMMENT #13 - Melanie wins the awesome bookmark from Flutterby Kisses!
Please email me within 48 hours to claim your prize (Prize winner chosen using random.org)
Happy Monday!
I hope everyone is doing well this fine morning! I am still pretty excited about my 1000 Fan Celebration! It was such a great party! I hope you all had a great time!
I am also pretty excited to introduce you to Flutterby Kisses!

Now here are some of my favorites...

Now, in this day and age with all our lovely technology I still like to grab my book and read the 'old-fashioned' way so of course I want a cute bookmark to hold my spot! Paula makes the cutest ones too and she is offering one to IHRnR fans! Here it is...doesn't it rock!?!

Please email me within 48 hours to claim your prize (Prize winner chosen using random.org)
Happy Monday!
I hope everyone is doing well this fine morning! I am still pretty excited about my 1000 Fan Celebration! It was such a great party! I hope you all had a great time!
I am also pretty excited to introduce you to Flutterby Kisses!
Now here are some of my favorites...

Aren't they just the cutest? I Heart Them All!
Now, in this day and age with all our lovely technology I still like to grab my book and read the 'old-fashioned' way so of course I want a cute bookmark to hold my spot! Paula makes the cutest ones too and she is offering one to IHRnR fans! Here it is...doesn't it rock!?!

Want to win? Here's what you have to do...
Mandatory Entry -
-Like Flutterby Kisses on Facebook {1 entry}
Bonus Entries -
-Comment here what your favorite item is from her shop {1 entry}
-Blog, tweet, and/or share this giveaway {up to 3 entries}
-Make a purchase from Flutterby Kisses {3 entriesNow make sure you leave a separate comment for each entry!Contest ends Fridy, May 7th! Winner will be announced her on the bloggy blog!
Peace out - T
Subscribe to:
Posts (Atom)